
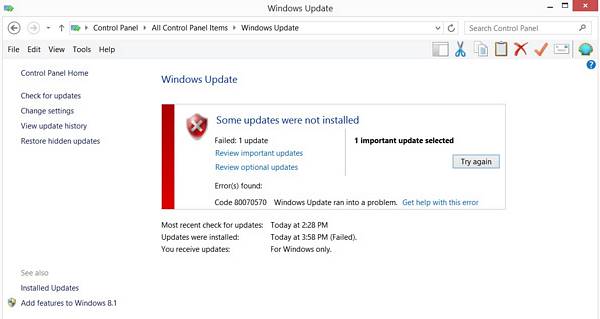
So, just like everyone else who disklike the Windows 8.1, I couldn’t wait to upgrade my laptop to Windows 10 (it’s just like a hopeful life line for Windows OS). Anyhow, I had to reserve the Windows 10 because there are some software prevent the Windows 8.1 to update – and without the full system updated, Windows 10 can’ t upgrade at all – It’s like the catch 22, so I would be waiting for the rest of my life to get my laptop 8.1 ready for Windows 10. This is how I get my Windows 10 upgraded right away.
*** Before you upgrade your HP laptop to Windows 10, make sure yours is not on the list of “Can’t wake up with Windows 10” like mine. What happens is when you close the lid or put the computer to sleep, when you open the lid or use the keyboard to wake the computer, a black screen only and you have to turn off the computer with the power button and start the computer all over again. Sometimes it got stuck at the boot and you have to turn it off and on again. Windows 10 is NOT to rescue the bad Windows 8.1, just make it worse. I don’t use Windows that often so
I’ll try to fix the problem later. Even HP support can’t seem to fix the wake problem ***
Regardless, if you want to upgrade to Windows 10 because people are raving about it, then this is how you do it even if your computer failed to update Windows 8.1 to where Windows 10 qualifies your laptop to upgrade.
[title]Create Windows 8.1 USB Installer[/title][body]
How to create Windows 8.1 USB Installer.
[/body]
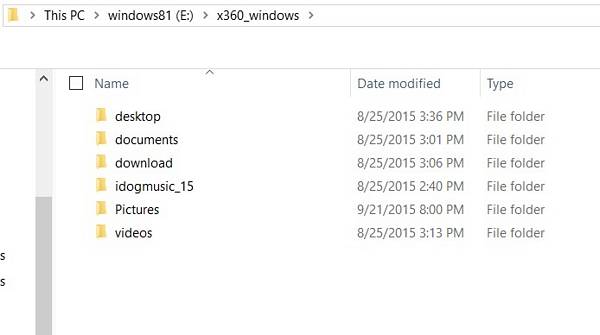
The most IMPORTANT thing to do is to copy all data in User account folders: Desktop, Documents, Downloads, Pictures, Videos, Music, etc, because when you installed new Windows 8.1, you may delete the oldwindows by mistake which includes User accounts (I did).
Since we’re not going to reformat the hard drive, all data in C: drive will be untouched.
[title1]Install Windows 8.1 Using Windows 8.1 USB Installer[/title1][body1]
Now, after backing up all data, it’s time to re-install Windows 8.1, this version will have all the updates and ready for Windows 10 upgrade as soon as we finished installing it. In order for the USB to boot, we need to go into the bios setting, and enable the legacy boot. “F10” to enter bios and “F9” to select boot devices.


– Plug in the Windows 8.1 USB Installer, turn on the laptop, hit “F9” to select device to boot, select Windows 8.1 USB installer (UEFI – important) and let Windows 8.1 to install. Use advanced option, select the partition of the old windows, install to that partition (biggest size partition in GB), Windows installer will confirm that the old windows will be rename to windowsold and the new one will be created, click ok and start installing. When it’s done, connect to the internet and use HP support assistant to download and install all the software.
– Go to Windowsold, Users, and start copy all the data folders over to the SAME new folders, then delete Windowsold when everything is done.
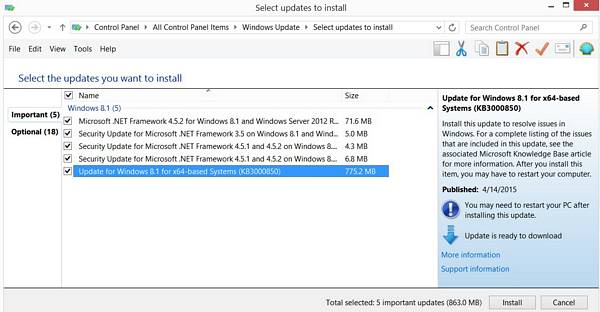
– Search Windows 10 upgrade, click upgrade at it will upgrade for you. Just follow the instructions, make sure you have at least 1 hour to do, depend upon how fast your internet is. It’s very slow, always with Windows.
[/body1]
[title2]Setup Wireless Printer With Windows 10[/title2][body2]
[/body2]