
Install Mavericks 10.9.2 To USB External Hard Drive[/bslue]
Alright, if you can’t afford to get a $40-$50 500GB USB external hard drive, I don’t think you should do this. I always installed and experimented any new Mac OSX onto external USB drive before I restore it to the internal hard drive because if it doesn’t perform as I expected with everything working, I don’t want to waste my time and effort going through installing Windows and wipe out my hard drive.
1. Boot to Mavericks installer to configure the external USB hard drive if you don’t have a Mac. Use one of those chameleon boot and installer we made before.
2. Install Mavericks onto the external USB hard drive.
Some common problems after installation.
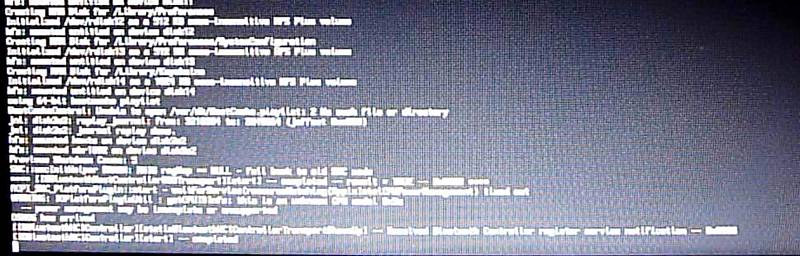
A. Boot up stuck at IO Bluetooth controller – On the internet, many solutions referred to removing all the graphics kexts, it wasn’t the case, just replace the AppleACPIPlatform.kext to an older version, there are many on the internet for Mavericks.
AppleACPIPlatform.kext needed to fix all the smckeyerror and bluetooth hangs
B. “Waiting for root device” – If the laptop doesn’t have AHCI enabled option, we need to add the third party AHCI kext to the Extra folder to get the hard drive to recognize, also use USB3.0 generic kexts in the extra folder.
After installation, we need to add backlight control slider to dsdt and put it in the Extra folder.
Device (PNLF)
{
Name (_HID, EisaId (“APP0002”))
Name (_CID, “backlight”)
Name (_UID, 0x0A)
Name (_STA, 0x0B)
}
[/body4]
[title5]Optimize The Mavericks Performance and Functionality[/title5][body5]
A fully working Mavericks should have all these features working:
1. Graphics QE/CI working – proof is translucent menu bar or ability to screen recording in Quicktime Player.
2. Wifi and Ethernet working natively – built in – hence replacing the non supported module with supported ones.
I have this weird problem with wifi – chameleon bootloader – clover bootloader works fine but other problems.
3. Ability to login to Itunes, Apps Store, iCloud, iMessage, Mail and FaceTime.
Device-Properties for HD4000 + Ethernet EN0 Built-in – Copy this whole string no space anywhere to your org.chameleon.Boot.plist
9d00000001000000020000003f0000000100000002010c00d041030a0000000001010600001c0101060002007fff0400160000006200750069006c0074002d0069006e0000000500000001520000000100000002010c00d041030a000000000101060000027fff04002c0000004100410050004c002c00690067002d0070006c006100740066006f0072006d002d006900640000000800000003006601
4. Boot into partition without any flags like -x -f cpus=1, etc.
5. Sleep/Wake – Speed steps – Turbo speed must work to save battery and performance when needed.
6. Sync Time Between Windows 8.1 and Mavericks
[/body5]
[title6]Install Windows and Mavericks Onto Hard Drive[/title6][body6]
The important thing about install Windows 8.1 onto the hard drive is to NOT select UEFI installation and use normal installation option. The difference will be “HP” logo if install using UEFI and “Windows” logo NON-UEFI. Use Chameleon boot and Mavericks installer to partition the hard drive FIRST as MBR scheme and 1 partition only – format it to FAT or NTFS is fine.
Install Windows 8.1 To New MBR partition table.
Install Mavericks 10.9.1 Onto Hard Drive Partition.
Many people like to use 3rd partition software to split or create partition for Mac OS X. I think using Windows shrink partition option is the best because if something goes wrong, you can always use Windows to delete the partition, extend it and re-shrink again to a different size. Chameleon or any multi boot loader can access the partition easily.
I just tried the SuperDuper clone software and it works extremely well for restoring a fully working partition to hard drive. So this will be the preferred method to restore the fully working external USB hard drive Mavericks to the hard drive partition.
So, it doesn’t matter if you use method of installing from OS X Base Installer or Restore the working Mavericks from a USB drive, you still may have to fix the boot0: error and Windows /BootBCD error. Here is how to fix it.
2 Trackbacks and Pingbacks